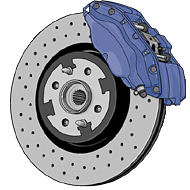
How to Replace Brakes
If you are an amateur mechanic, learning how to replace brakes yourself is a way to save money on automotive repair. People wear out brakes quicker than ever today, given the amount of commuting we do and the less sturdy engineering that goes into car production. Good brakes are essential to the safety of your car, because you don’t want you brake system faltering in the middle of rush hour.
Once again, this is a job you can do at home, if you’re mechanically-inclined. If you don’t enjoy your own auto repairs or you aren’t a skilled mechanic, take your vehicle into a shop to have your brakes serviced by a professional. If you do choose to make your own repairs, purchase an official automotive repair guide, with specific repair instructions for the particular make, model and year of your vehicle.
The information in this article presents a broad overview of the brake service procedure. It’s not intended to serve as a complete set of instructions, but as brake replacement basics to get you started. What you learn about how to replace brakes in this article won’t replace years of training and experience around cars.
Please consult a mechanic or official automotive repair manual if you have any questions or concerns as this might save your life.
Replacing Brakes
Your average full service brake job includes replacing the brake pads, turning or replacing the rotors, draining the brake fluid and replacing it, while making sure not to leave air bubbles in the lines, inspecting the seals on the wheel cylinders and making sure that the master cylinder is in working order. The following are a set of steps you can follow when replacing brakes.
Step 1
Secure your vehicle on an automotive hoist. Make sure your hoist is squarely underneath and fitted to load-bearing surfaces of your vehicle. Using a torque wrench or tire iron, remove the lugs on either the front or rear wheels.
Remove the wheels from the vehicle using a torque wrench or tire iron. Make sure to leave the opposite brake assembly intact, to serve as a model in case you forget how to put the brakes back together.
Step 2

How to Replace Breaks
Inspect the wheel cylinder dust boot, to make sure no fluid is leaking out and the rubber isn’t cracked. Inspect your master cylinder to see if it’s working properly and isn’t leaking fluid.
Remove the caliper from the rotor, so you can replace the brake pads. Loosen the mounting bolts of the caliper in order to release it from the rotor. Inspect your brake hose, to make sure that it doesn’t need to be replaced, as well.
Step 3
Remove the old pads. Clean the caliper slides, pad mounts and anywhere else that directly touches your brakes.
Remove the rotor. Inspect the rotor to see if it needs to be replaced, or if you can salvage it by turning it on a specialized lathe. Clean the surface where the rotor was mounted, to keep the newly-installed parts working smoothly.
Step 4
Depress the caliper piston using a C-clamp, removing the lid of the master cylinder, in case any extra brake fluid needs to be released during the process. After the caliper piston has been depressed, install the new rotor. Put the caliper mount and new brake pads back on.
Replace the caliper. Put the lid back on the master cylinder as well, unless otherwise instructed by your repair manual.
Step 5
Bleed the brake system, to ensure that no air has been trapped in the lines during this procedure. It helps to have a partner assist you, by pumping the pedal for a bit. Have someone hold down the break pedal with their foot, while you bleed the air from the lines.
Refer to your automotive repair manual often, if you’re never replaced brakes on your car before. Don’t drive your vehicle, until pedal functions return to normal.
It’s best to test your new brakes out in an expansive, flat, empty area, in case of brake failure. If your brakes work, you now know how to replace brakes.
